Photo by Lia Trevarthen on Unsplash
Setting up an NFS Persistent Volume in Kubernetes might sound technical, but for me, it started with a nearly full disk and an old laptop.
Last week, I finally deployed Kubernetes on my home lab. Everything was running smoothly—until I noticed my main node was nearly out of disk space. Pods slowed down. Deployments lagged. My cluster felt like a busy kitchen running out of counter space.
Then I remembered an old laptop tucked away in a drawer. I wiped it, installed OpenMediaVault, and turned it into a lightweight NFS server. This simple addition gave my Kubernetes cluster shared storage and a whole new level of flexibility.
In this guide, I’ll walk you through how to configure an NFS Persistent Volume in Kubernetes—step by step so you can avoid the same headache I had and keep your workloads running smoothly.
Let’s Begin with Some Basics
Before we dive in, let’s understand what NFS means. According to Wikipedia, NFS (Network File System) is a way for computers to share files over a network, just like they’re stored on your own computer. It was first created by Sun Microsystems in 1984.
Now, to make Kubernetes use NFS, we need to do a few things. First, we have to install the NFS CSI driver (current stable version si 4.11.0) on our Kubernetes cluster.
To do that, run this command:
curl -skSL https://raw.githubusercontent.com/kubernetes-csi/csi-driver-nfs/v4.11.0/deploy/install-driver.sh | bash -s v4.11.0 --Once the driver is installed, the next step is to create a StorageClass, this is what tells Kubernetes how to use the NFS storage.
If you’re running your Kubernetes nodes on a Debian-based system (like Ubuntu), make sure the NFS client package is installed. Without it, the nodes won’t be able to connect to the NFS server.
Run this command:
apt install nfs-commonCreating Storage Class
Create a StorageClass YAML file defining the NFS storage parameters, including the server IP and share path. An example configuration snippet is provided below:
apiVersion: storage.k8s.io/v1
kind: StorageClass
metadata:
  name: nfs-csi
provisioner: nfs.csi.k8s.io
parameters:
  server: 192.168.2.14 # here your IP
  share: /export/k8s # folder path
reclaimPolicy: Delete
volumeBindingMode: Immediate
allowVolumeExpansion: true
you may need more paramas so refer to the docs
Creating Persistent Volume Claim (PVC)
Define a PersistentVolumeClaim YAML file specifying the storage requirements and using the NFS storage class. Here is an example snippet:
apiVersion: v1
kind: PersistentVolumeClaim
metadata:
  name: nfs-pvc
spec:
  accessModes:
    - ReadWriteMany
  resources:
    requests:
      storage: 1Gi
  storageClassName: nfs-csi
Creating Deployment:
Finally, set up a Deployment YAML file that uses the PVC to deploy an application. An example configuration for an busybox deployment with NFS storage is shown below:
apiVersion: apps/v1
kind: Deployment
metadata:
  name: busybox-nfs
spec:
  replicas: 1
  selector:
    matchLabels:
      app: busybox-nfs
  template:
    metadata:
      labels:
        app: busybox-nfs
    spec:
      containers:
      - name: busybox
        image: busybox
        command: ["/bin/sh", "-c"]
        args:
          - |
            while true; do
              echo "$(date) from $(hostname)" >> /mnt/nfs/test.log;
              sleep 5;
            done
        volumeMounts:
        - name: nfs-volume
          mountPath: /mnt/nfs
      volumes:
      - name: nfs-volume
        persistentVolumeClaim:
          claimName: nfs-pvc
Applying Configurations and Verification:
Apply the PVC and Deployment YAML files to the Kubernetes cluster using the kubectl apply command. Verify the created PersistentVolumeClaim using kubectl get pvc to ensure successful setup.
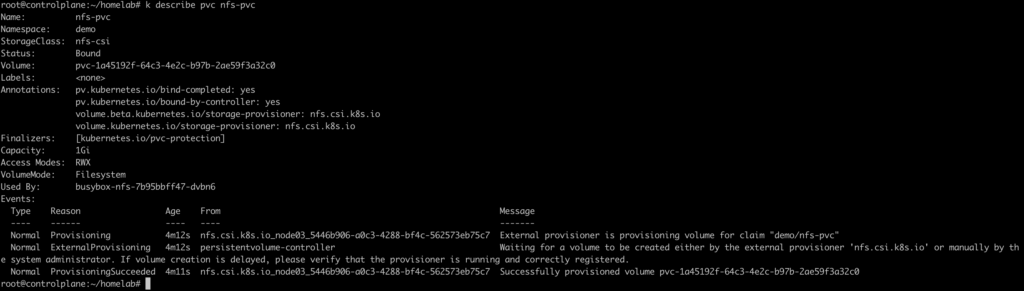
Once the PVC is created, you should make sure it’s working. Run kubectl describe pvc “nfs-pvc” command:
To verify the functionality, go to the NFS server and navigate to the export directory where Kubernetes stores data. Inside this directory, you should find a folder with the PVC ID and a file that is regularly updated. For instance

You can check the contents of the log file by running:
These log entries show that the BusyBox pod is successfully writing data to the NFS volume. That confirms your setup is working as expected!
One of the best things about using NFS with Kubernetes is data persistence.
Even if your pod is deleted, the data remains safe on the NFS server. For example, the test.log file we saw earlier is still there, untouched, even if the busybox pod is gone.
This is very useful when you’re running applications that need to save data—like databases, file upload services, or logging systems. Your data won’t disappear just because a pod restarts or is replaced. It’s stored safely in the NFS location.
Conclusion:
By following these steps, you can effectively configure Kubernetes to utilize NFS storage, enabling efficient utilization of resources and addressing space limitations on your cluster.
Feel free to reach out if you have any questions or need further assistance!
For more articles on topics like NFS Persistent Volume in Kubernetes and cloud-native tooling, check out Let’s Talk About DevOps.