I truly hope it treats you awesomely on your side of the screen :),
in this blog, I want to give a tutorial on how to configure Nginx as a load balancer.
What is a load balancer?
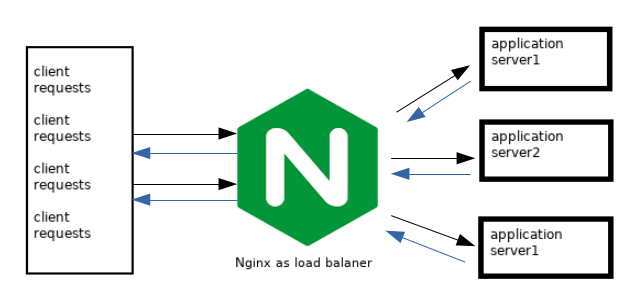
A load balancer is a hardware/software that acts as a reverse proxy and distributes network or application traffic across a number of servers. Load balancers are used to increase the capacity (concurrent users) and reliability of applications. They improve the overall performance of applications by decreasing the burden on servers associated with managing and maintaining application and network sessions.

Choosing a Load Balancing Method
NGINX Open Source supports four load balancing methods, and NGINX Plus adds two more methods:
1- Round Robin: Requests are distributed evenly across the servers, with server weights taken into consideration. This method is used by default (there is no directive for enabling it):
upstream backend {
   # no load balancing method is specified for Round Robin
   server backend1.example.com;
   server backend2.example.com;
}
2- Least Connections: A request is sent to the server with the least number of active connections:
upstream backend {
    least_conn;
    server backend1.example.com;
    server backend2.example.com;
}
3- IP Hash: The server to which a request is sent is determined from the client IP address. In this case, either the first three octets of the IPv4 address or the whole IPv6 address are used to calculate the hash value. The method guarantees that requests from the same address get to the same server unless it is not available.
upstream backend {
    ip_hash;
    server backend1.example.com;
    server backend2.example.com;
}
4- Generic Hash: The server to which a request is sent is determined from a user-defined key which can be a text string, variable, or combination. For example, the key may be a paired source IP address and port, or a URI as in this example:
upstream backend {
    hash $request_uri consistent;
    server backend1.example.com;
    server backend2.example.com;
}
5- Least Time (NGINX Plus only) : For each request, NGINX Plus selects the server with the lowest average latency and the lowest number of active connections, where the lowest average latency is calculated based on which of the following parameters to the least_time directive is included:
* header: Time to receive the first byte from the server
* last_byte: Time to receive the full response from the server
* last_byte inflight: Time to receive the full response from the server, taking into account incomplete requests
upstream backend {
    least_time header;
    server backend1.example.com;
    server backend2.example.com;
}
6- Random: Each request will be passed to a randomly selected server. If the two-parameter is specified, first, NGINX randomly selects two servers taking into account server weights, and then chooses one of these servers using the specified method:
* least_conn : The least number of active connections
* least_time=header (NGINX Plus) : The least average time to receive the response header from the server ($upstream_header_time)
* least_time=last_byte (NGINX Plus) : The least average time to receive the full response from the server ($upstream_response_time)upstream backend {
    random two least_time=last_byte;
    server backend1.example.com;
    server backend2.example.com;
    server backend3.example.com;
    server backend4.example.com;
}
The Random load balancing method should be used for distributed environments where multiple load balancers are passing requests to the same set of backends. For environments where the load balancer has a full view of all requests, use other load balancing methods, such as round-robin, least connections and least time.
Make server down
If one of the servers needs to be temporarily removed from the load balancing rotation, it can be marked with the down parameter in order to preserve the current hashing of client IP addresses. Requests that were to be processed by this server are automatically sent to the next server in the group:
upstream backend {
    server backend1.example.com;
    server backend2.example.com;
    server backend3.example.com down;
}
Configure a server as a backup
The backend3 is marked as a backup server and does not receive requests unless both of the other servers are unavailable.
upstream backend {
    server backend1.example.com;
    server backend2.example.com;
    server backend3.example.com backup;
}
Let’s move to the practice
Requirement:
- docker
- docker-compose
You can pick one of these methods above, for me I will choose Round Robin, after cloning the repo into your local machine,
project files structures:
nginx-as-load-balancer
    |
    |---app1
    |     |_ app1.py
    |     |_ Dockerfile
    |     |_ requirements.txt
    |
    |---app2
    |     |_ app2.py
    |      |_ Dockerfile
    |      |_ requirements.txt
    |
    |---app3
    |     |_ app3.py
    |     |_ Dockerfile
    |     |_ requirements.txt
    |
    |---nginx
    |     |_ nginx.conf
    |     |_ Dockerfile
    |
    |____docker-compose.ymlgit clone https://github.com/elfarsaouiomar/nginx-as-load-balancer.git && cd nginx-as-load-balancer
use docker-composer to build and run containers
docker-compose up -d
after running containers let’s check if our load balancer is working as we expected.
while true; do curl http://127.0.0.1; sleep 0.2; done
The output will be something similar to
Hi from app 3 **new app**
Hi from app 1
Hi from app 2
Hi from app 3 **new app**
Hi from app 1
Hi from app 2
Hi from app 3 **new app**
Hi from app 1
Hi from app 2
Hi from app 3 **new app**
Hi from app 1
Hi from app 2
Hi from app 3 **new app**
Hi from app 1
Hi from app 2
Hi from app 3 **new app**
Hi from app 1
Hi from app 2
Hi from app 3 **new app**
Hi from app 1
Hi from app 2
Hi from app 3 **new app**
Hi from app 1
Hi from app 2
Hi from app 3 **new app**
Hi from app 1
Hi from app 2
Conclusion
onfiguring NGINX as a load balancer can significantly enhance your application’s performance and reliability. We’ve walked through the key load balancing methods and set up a practical example using Docker. With this knowledge, you’re well-equipped to optimize traffic distribution and improve your system’s scalability. Keep experimenting with different configurations to best meet your application’s needs. Thanks for reading!


One Comment
Comments are closed.